
If the share buttons of Facebook, Twitter or G+ are too popular for blogspot/websites, the Zalo share button is currently used by very few blogs.
Zalo is a Vietnamese social network. Zalo is developed by VNG. Nowadays Zalo is used quite commonly for business and brand development.
So why don't we take advantage of it to increase traffic to the blog/web because its application also provides a number of utilities that can be integrated into the blog such as share button, interest button, webchat and webcommentszalo...
Zalo's share button settings include 2 cases:
- Instructions for creating the default zalo sharing button for blogspot website.
- Instructions for creating a custom zalo share button for blogspot website.
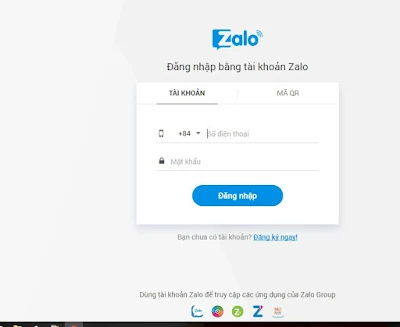
Step 1: Visit http://oa.zalo. me/ and log in to your zalo account.
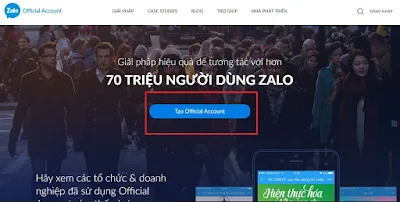
Step 2: Create an Official Account for yourself. If you already have one, skip this step.
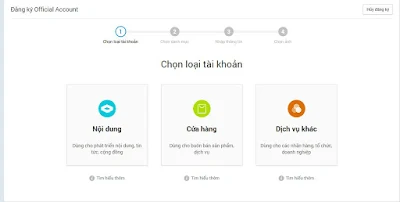 Choose the account type that suits your blog.
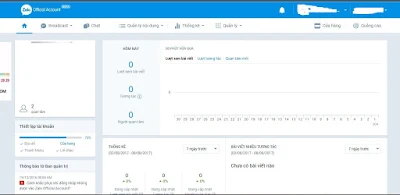
After creating, you will have an interface like this
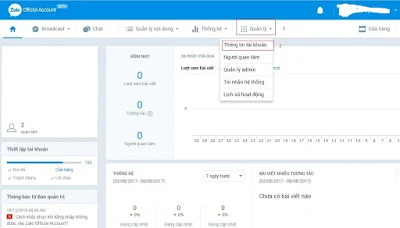
Bước 3: Bạn chọn mục Quản lý -> Thông tin tài khoản để lấy Official Account ID
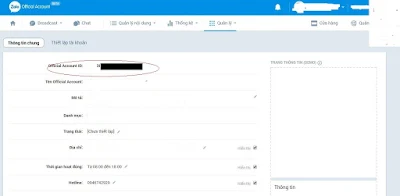 You need to remember the Official Acecount ID in the red circle to use for the code later.
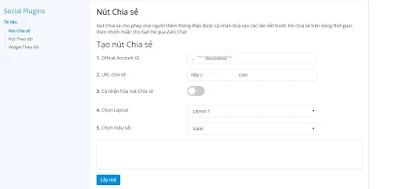
Step 4: Next you access http://developers.zalo.me/docs/social/share
This will let you create share buttons, follow buttons and widgets for your Official Account.
Here I will select the share button. Fill in all information as required.
 After getting the code, you will get a javascript file and HTML code to install into your blog.
+ Paste the js file before the tag </body>
Or use the following javascript instead of the above js file
In there:
- data-layout: The share button includes the Zalo icon and the text "Share"
Default: the share button only contains the Zalo icon
- data-oaid: Zalo Official Account ID
- data-customize: true/false. Default: false.
If set true, layout By default, the Share button will not be displayed,
Developers can customize the Share button their own way.
- data-href: URL you want to share..
The complete code example has the form:
Step 1:
Add CSS
Add js file first </body>
Add the zalo share button to the position you want
Zalo is a Vietnamese social network. Zalo is developed by VNG. Nowadays Zalo is used quite commonly for business and brand development.
So why don't we take advantage of it to increase traffic to the blog/web because its application also provides a number of utilities that can be integrated into the blog such as share button, interest button, webchat and webcommentszalo...
Zalo's share button settings include 2 cases:
- Instructions for creating the default zalo sharing button for blogspot website.
- Instructions for creating a custom zalo share button for blogspot website.
Instructions for creating the default zalo share button for blogspot website
If you do not have a Zalo account, please register for an account before performing this installationStep 1: Visit http://oa.zalo. me/ and log in to your zalo account.
Step 2: Create an Official Account for yourself. If you already have one, skip this step.
After creating, you will have an interface like this
Bước 3: Bạn chọn mục Quản lý -> Thông tin tài khoản để lấy Official Account ID
Step 4: Next you access http://developers.zalo.me/docs/social/share
This will let you create share buttons, follow buttons and widgets for your Official Account.
Here I will select the share button. Fill in all information as required.
+ Paste the js file before the tag </body>
<script src="https://sp.zalo.me/plugins/sdk.js"></script>Note:Js files can use async='async'
Or use the following javascript instead of the above js file
<script>
 if (!window.disableZalo && window.innerWidth > 600) {
  (function(d, s, id){
   var js, fjs = d.getElementsByTagName(s)[0];
   if (d.getElementById(id)){ return; }
   js = d.createElement(s); js.id = id;js.async=true;
   js.onload = function(){
    // remote script has loaded
   };
   js.src = "//sp.zalo.me/plugins/sdk.js";
   fjs.parentNode.insertBefore(js, fjs);
  }(document, 'script', 'zalo-jssdk'));
 }
</script>
+ Paste the following html where the share button needs to be displayed.<b:if cond='data:blog.pageType == "item"'> <div class="zalo-share-button" expr:data-href="data:post.canonicalUrl" data-oaid="ID của Trang" data-layout="1" data-color="blue" data-customize="false"></div> </b:if>Change the Page ID to Official Acecount ID in step 3.
In there:
- data-layout: The share button includes the Zalo icon and the text "Share"
Default: the share button only contains the Zalo icon
- data-oaid: Zalo Official Account ID
- data-customize: true/false. Default: false.
If set true, layout By default, the Share button will not be displayed,
Developers can customize the Share button their own way.
- data-href: URL you want to share..
The complete code example has the form:
<b:if cond='data:blog.pageType == "item"'> <div class="zalo-share-button" expr:data-href="data:post.canonicalUrl" data-oaid="579745863508352884" data-layout="1" data-color="blue" data-customize="false"></div> </b:if>Note: The data-layout section has 4 button styles corresponding to 1, 2, 3, 4 for you to choose from, so you can change from 1-4 to your liking.
Instructions for creating a custom zalo share button for blogspot website
The steps are almost similar to the case of installing the default Zalo share button, only slightly different.Step 1:
Add CSS
.rrssb-zalo{cursor:pointer}
.rrssb-zalo a{background-color:#018fe5;padding:6px 10px 0 0;border-radius:3px}
.rrssb-zalo svg{height:18px;margin-top:6px;margin-left:10px}
.zshare-zalo{display:inline-block;cursor:pointer;border-radius:3px;height:20px;background:#008fe5;color:#fff;padding:0 5px}
.zshare-zalo:hover{background:#0c7abf}
.zshare-zalo svg{margin-top:1px}
.zshare-label{display:inline-block;font-weight:bold;font-size:13px;line-height:16px;height:20px;vertical-align:top;color:white;margin-left:3px;margin-top:6px}
Step 2:Add js file first </body>
<script src="https://sp.zalo.me/plugins/sdk.js"></script>Step 3:
Add the zalo share button to the position you want
<b:if cond='data:blog.pageType == "item"'>
<div class="rrssb-zalo">
<a class="zalo-share-button" expr:data-href="data:post.canonicalUrl" data-oaid="Zalo Official Account ID của bạn" data-layout="icon-text" data-customize="true">
<svg version="1.1" xmlns="http://www.w3.org/2000/svg" xmlns:xlink="http://www.w3.org/1999/xlink" x="0px" y="0px" viewBox="0 0 150.3 149.9" enable-background="new 0 0 150.3 149.9" xml:space="preserve" style="height: 18px;">
<g id="Layer_1">
</g>
<g id="Layer_2">
<g>
<path fill="#FFFFFF" d="M128,70.3c-2.4,0-4.3,1-5.6,3c-1.2,1.8-1.8,3.9-1.8,6.4c0,2.6,0.6,4.8,1.7,6.5c1.3,2,3.2,3.1,5.7,3.1
c2.4,0,4.3-1,5.7-3.1c1.2-1.8,1.7-3.9,1.7-6.5c0-2.5-0.6-4.6-1.8-6.4C132.2,71.3,130.4,70.3,128,70.3z" />
<path fill="#FFFFFF" d="M65.3,70.7c-2.3,0-4.2,0.9-5.5,2.8c-1.2,1.7-1.8,3.7-1.8,6.2c0,2.5,0.6,4.6,1.7,6.3
c1.3,1.9,3.2,2.9,5.6,2.9c2.3,0,4.2-1,5.5-3c1.1-1.7,1.7-3.8,1.7-6.2c0-2.4-0.6-4.4-1.8-6.1C69.4,71.7,67.6,70.7,65.3,70.7z" />
<path fill="#FFFFFF" d="M75.1,0C33.6,0,0,32.3,0,72.2c0,20.9,9.3,39.8,24.1,52.9l-1.3,24.8l22.1-11.7c9.3,3.9,19.5,6.1,30.3,6.1
c41.5,0,75.1-32.3,75.1-72.2C150.3,32.3,116.6,0,75.1,0z M37.7,98.8H14.5c-5.4,0-8.1-1.9-8.1-5.8c0-1.8,1.1-4.2,3.2-7l20.7-27.4
H15.4c-5.5,0-8.2-1.7-8.2-5.2c0-3.5,2.7-5.3,8.2-5.3H35c6.6,0,9.9,1.9,9.9,5.6c0,1.7-1.1,4-3.4,7.1L21.3,88.1h16.3
c5.5,0,8.2,1.8,8.2,5.3C45.9,97,43.2,98.8,37.7,98.8z M83.8,91.1c0,5.5-1.8,8.2-5.5,8.2c-2.4,0-4.2-1.3-5.4-3.9
c-2.3,2.9-5.5,4.3-9.4,4.3c-5.2,0-9.4-2.1-12.6-6.2c-3-3.8-4.5-8.4-4.5-13.6c0-5.3,1.6-9.9,4.7-13.7c3.3-4.1,7.6-6.2,12.8-6.2
c3.8,0,6.8,1.3,9,4c1.3-2.4,3.1-3.6,5.4-3.6c3.7,0,5.5,2.7,5.5,8.1V91.1z M103.1,91.1c0,5.5-1.8,8.2-5.5,8.2
c-3.8,0-5.6-2.7-5.6-8.2V52.6c0-5.5,1.9-8.2,5.6-8.2c3.7,0,5.5,2.7,5.5,8.2V91.1z M128,99.9c-5.7,0-10.3-1.9-13.9-5.8
c-3.5-3.8-5.2-8.5-5.2-14.3c0-5.7,1.7-10.5,5.2-14.2c3.6-3.9,8.2-5.8,13.9-5.8c5.7,0,10.3,1.9,13.9,5.8c3.4,3.8,5.1,8.5,5.1,14.3
c0,5.8-1.7,10.5-5.1,14.3C138.3,98,133.7,99.9,128,99.9z" />
</g>
</g>
<g id="Layer_3">
</g>
</svg>
<span class="zshare-label" style="">Chia sẻ</span>
</a>
</div>
</b:if>
+ With the above code, you can customize it to your liking based on css<div class="rrssb-zalo">
<a class="zalo-share-button" expr:data-href="data:post.canonicalUrl" data-oaid="Zalo Official Account ID của bạn" data-layout="icon-text" data-customize="true">
Vị trí bạn tùy biến theo sở thích
<span class="zshare-label" style="">Chia sẻ</span>
</a>
</div>
Wish success.
Tags:
Blogger tricks